Laser etching a MacBook Air

I had the opportunity to etch a MacBook Air for my friends at Panic last week and made a short video to show the process.

Posted in video | Tagged , , | Comments Off

Scherenschnitte template: Girl feeding a chicken

Papercut of a girl feeding a chicken

For the last two Fridays I’ve created new wall pieces, first a papercut with elephants (“Abatee”) and next a girl feeding a chicken (“Early Bird”).

For those of you interested in the craft of Scherenschnitte I thought you might enjoy cutting the main layer of Early Bird as a standalone piece.

Download zip of “Early Bird” in pdf & png formats.

Silhouette of girl feeding chicken - original design by Sarah Holbrook

Creative Commons License
This work is licensed under a Creative Commons Attribution-NonCommercial-ShareAlike 3.0 Unported License.

Attribution required: “Early Bird” by Sarah Holbrook (http://candyspotting.com)

Posted in Uncategorized | Tagged , , , | Comments Off

Running slow: eliminating wobbles

There is a trade off between speed and quality with x-y laser cutting. This 80# cardstock test shows a slow run on the left and a fast run on the right. To get the best results I run the laser at a slow speed; it ensures very smooth curves and a close representation of the original art.

At a fast speed the laser beam carriage runs with some wobbles. If this loss in accuracy is acceptable for your project please let me know. Depending on the circumstances it may lower the cutting cost 10-50%.

Posted in regular | Tagged , , , , | Comments Off

Cutting OSBP’s logo: behind the scenes

I was delighted to have Carina of Crow & Canary swing by the workshop last week to take some photos for a guest post on Oh So Beautiful Paper. Here’s what it took to prepare the OSBP logo, with calligraphy by Bryn Chernoff, to be cut.

Here is the original logo:

Original version of OSBP logo

and here is the laser-ready version:

The OSBP logo prepared for the laser

The original logo would cut as several separate pieces (“O” “H” “S” “O” “Beautiful” “P” “aper” and the dot of the “i”), so the first thing I did was tie everything together. I start with a frame that the words will be bridged to:

OSBP logo with a simple frame

The straightforward solution to bridge the text is to add a rectangle that intersects each text baseline. Tall portions of the design might flop over when the paper is held upright, so those need to be secured as well.

OSBP with lines added to bridge to the frame

Unfortunately, this doesn’t fit with the aesthetic of the logo and the long start to the “P” is likely to sag. Instead, I decided to pull everything together with some well placed curves.

OBSP tied to the border with curves

Next, all of the black portions of the image are unioned together. The correct line width and color are selected for compatibility with the laser, the path is offset to adjust for the kerf, and a test cut is made.

The test cut revealed a few weak spots so the paths were tweaked and it was ready to go. The video took several takes; I’m a video novice so it took a while to get reasonable depth of field with the low light in the workshop.

Please let me know what topics you’d like to hear more about. I’ve been working on an FAQ for the site that touches on several areas that could be addressed in more detail. Thanks for reading!

Posted in regular, video | Tagged , , , | Comments Off

How to improve laser raster images with tuning

Adjusting the “tuning” in the Universal Control Panel (UCP) can make a dramatic difference in the clarity of raster images. For GCC/LaserPro machines this feature is also called tuning. On Epilog it is called “Laser Match.”

Last autumn I added a second laser to my shop. One day I saw a live auction listing and the next I was the slightly nervous and very excited owner of a machine that I’d never seen powered on. The first text tests were barely legible. One of the many steps to refine the output was to adjust the tuning.

The following diagram demonstrates the result we would like to achieve.

When a raster image is sent to the laser the driver splits it into horizontal slices. Each slice represents a pass that the laser head will make in the X direction of travel.

Tuning changes the distance that the X belt moves before the laser begins to pulse in each row. Poor tuning will cause a misalignment of an etched line in the right-to-left direction versus the left-to-right direction.

The fix is fairly straightforward. First, draw a solid, long thin rectangle. Change the raster settings to use the lowest image density (lines per inch). Etch on a material that has very high contrast. Anodized aluminum is fantastic; since I didn’t have any on hand I used a dark black paper that shows a nice mark.

The desired result is for the left and right edges of each line to be flush. The following image shows an example of running this test. The first column shows the original ragged line. Next, I moved the line over, adjusted the tuning, and ran the job again. This is the value I chose; the next two tests use different tuning values and are slightly ragged again.

After fixing the tuning my sample text was still slightly blurry compared to the results from my other laser. The accelerating/decelleration curve didn’t seem as good on the older model. That is; it wasn’t slowing down enough to give a really clean etch. By lowering the speed I finally saw the crisp text that I demand.

If the tuning value you need to use seems unusually high or low you should check the laser’s X belt; it may be too loose.

Posted in Uncategorized | Tagged , , , , , | Comments Off

Freshly Cut: Thank You cards for Sense Labs

Cut from Neenah Oxford in Blue Chip

Check out the blog post over at Sense Labs about the custom thank you cards I cut for them. They requested a video so I tried to shine enough lights on the work area to make it visible. I also had to temporarily defeat the overlock so that I could film the work area directly instead of through the safety door’s glass.

Posted in Uncategorized | Tagged , , , | Comments Off

Overriding the ULS interlock

Enclosed lasers such as ULS and Epilog have a safety feature where the beam won’t fire if the doors are open. On my system the front panel shows a blinking red light when the doors are open and a green light when they’re shut. Yesterday the red light kept blinking even when the doors were shut.

Now, this is a very big problem, since it rendered the laser inoperable.

Hamlin 59140 miniature flange mount sensor

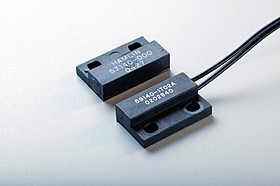
The interlock on ULS systems uses flange mount sensors (Hamlin 59140), two on each door. The sensor is mounted to the cabinet and the actuator to the door. When they touch the circuit completes.

There are at least five possible failure points:
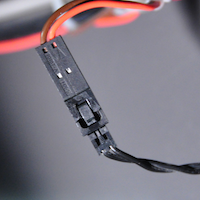
  1. Sensor plug
  2. Lead from the plug to the main system
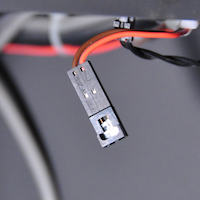
  3. Sensor
  4. Connection between sensor and actuator
  5. Actuator

The easiest route would be to rule out the connection and actuator first, but I didn’t know how to properly use magnets to do this (more on that later). Instead, I started by unplugging the sensors, inspecting them, and plugging them back in. Still no green light.

Permanently defeating the interlock

The next step was to take the sensor out of the equation. With the machine powered down, I unplugged the sensor and wrapped a piece of tinfoil around the two wires of the plug, completing the circuit. I got lucky with the first sensor I tried, and the light was once again green when the laser was powered up. Now that I knew which sensor was acting up and that the lead to the main system was okay, I could temporarily leave the tinfoil in place and figure out how to test the connection to the actuator.

Overriding the interlock with magnets

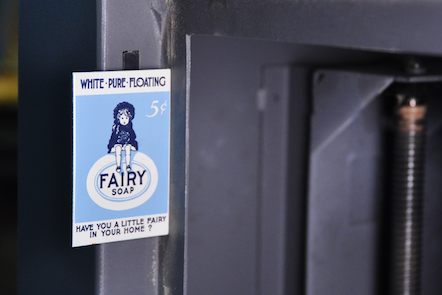
The standard trick to temporarily override the interlock is to use magnets. Some laser operators use this technique to engrave items longer than their laser bed. The front door is opened and the item projects past it. Some systems have a front and rear door for full pass-through. Safety glasses must be worn if the doors are open!

To allow the laser to fire, position magnets over the two front sensors on the cabinet. The magnet should be placed on one half of the sensor only; it will not work if it covers the entire sensor (this was the mistake I made earlier).

Removing the tinfoil and using the magnet test, I got a green light again, so the sensor was okay.

Now that I knew the problem was either with the connection between the sensor and actuator or actuator itself, I took a closer look with the door closed. There did seem to be a decent gap between the sensor and actuator, but I wasn’t sure if that was the problem. Since this just started occurring I thought it would be strange that the distance was suddenly too great.

Testing the actuator

With a magnet on one sensor, I unscrewed the actuator for the other and placed it directly on top of the sensor. Green light. Pulled it away a bit, still green light, a bit more, flashing red. I screwed the actuator back in on one side only, so that I could push the other side out a bit, making it closer to the sensor. Success!

Now, why did this happen? This problem occurred on my new-to-me laser, which is not yet in production. It’s been moved around quite a lot lately. First for workshop electrical upgrades, then a hardwired exhaust, and most recently to test tubes and try to get the beams aligned. My theory is that all of this moving has caused the front door to shift slightly so that it is closer to one side than the other. The tiny extra distance is too much for the sensor to pick up. I have tried moving the door back to center but no luck.

Posted in regular | Tagged , , , , | Comments Off

Beautiful toilet paper roll art by Anastassia Elias. (via)

Posted in photo | Comments Off

Freshly Cut – Stencil for Behrens Group

Brian of Behrens Group was commissioned by Make Animals and Opus Solutions to make some ”road cases” as part of Intel’s Rock Legend program. He was on a deadline so there wasn’t time to shop for materials; we used some 1/8” acrylic I had on hand. The art cut out well and the stencil worked great. Unfortunately the spray paint would build up on the stencil after a few uses so he had to laboriously clean it several times. Next time we will cut several copies out of matboard so that the cleaning step can be eliminated.

Photos graciously provided by Behrens Group.

Posted in regular | Comments Off

Etched iPad for Apparent Systems. They’re rolling out a bunch of these pre-loaded with a test version of their latest app.

The etching was pretty straightforward. I used my old iPhone as a material sample to get the settings right. Although it’s just an id mark the etching is quite lovely in person.

Posted in photo | Tagged , , | Comments Off